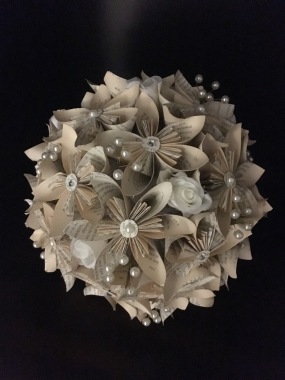
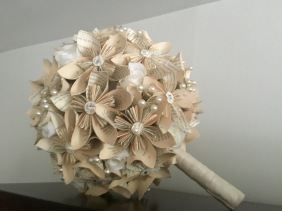
What are you supposed to do when you’re an engaged librarian who doesn’t want a floral bouquet?!? Well obvious go ahead and make your own using a donated Harry Potter book!
* Please note that while a book was harmed in the making, it was a very badly used book donated to the public library I work at. I see it as giving the book a new purpose in life!
Here are step by step instructions on how I made my book bouquet.
I made over 30 5-petal and 6-petal kusudama flowers.
Materials:
The majority of the items were purchased at Michael’s Craft store.
- A book
- Hot glue gun
- Adhesive pearls
- Adhesive rhinestones
- Toothpicks
- Box cutter
- Thick wooden dowel
- Styrofoam ball
- Fake flowers
- Ribbon
- Pearl clusters
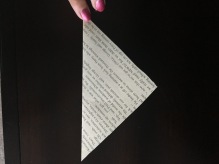
Step 1: Cut the paper
Measure 4×4 inches onto a book page (you can make them smaller, I would not recommend going any bigger).Then using a box cutter cut along the line. Doing it this way allows you to get several pages cut at once.


Step 2: Fold the paper in half
Fold the paper in half.
Step 3: Fold the points
Fold the side points up to the top of the triangle, make sure they are creased and aligned well.


Step 4: Fold the edges
The next two steps are some what confusing, there are a ton of youtube videos that can help clarify them. Fold the corners down (to the outside) to meet the edge of the paper, make sure to crease it well.


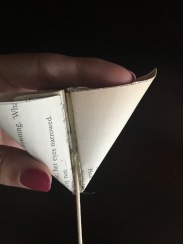
Step 5: Expand the triangles
Lift one side of the triangle and put your finger into the pocket it makes. Flatten the triangle along the creases so it expands into a diamond. I explained it to my fiance as popping out the triangle.


Step 6: Fold the flaps
Fold the top point of each diamond.


Step 7:Fold the flaps in
Fold the diamonds inwards along the crease.


Step 8: Hot glue shut
Place hot glue (or glue dots) along one side and fold the petal together. Please note that I used a low heat glue gun, this way I could get hands on without burning myself! Put a hair clip, bobby pin or paper clip to keep the petal closed while it dries.


Step 9: Repeat steps 1-9 until you have 5 or 6 petals
Step 10: Glue petals together
Place hot glue (or glue dots) along the edge of a petal and press it to another petal. Continue until you have 3 petals glued together. Repeat and glue 2 or 3 petals together.


Step 11: Glue toothpick
Glue a toothpick into the middle of the 3 petals.You can use a small wooden dowel if you want something sturdier, some of the toothpicks did break on me later on when placing the flowers into the bouquet.
Step 12: Glue sides together
Take your 3 petals with the toothpick and place hot glue along the inside. Push the other petal cluster to the toothpick one. Now you have a flower!!


Step 12: Repeat steps 1 – 12 until you have the desired number of flowers.
Step 13: Cut small circles
Cut small circles out of the paper, a dime is the perfect size.

Step 14: Place pearls and rhinestones
Place adhesiveness pearls and rhinestones into the center of the circles.


Step 15: Glue the circles
Place hot glue along the edge of the flowers circle and glue the pearls/rhinestones into the middle. This really adds a nice touch to the flowers!


Step 16: Wrap the dowel with ribbon
Glue ribbon to the bottom of the wooden dowel and wrap it around the dowel.


Step 17: Attach dowel to styrofoam ball
Hollow out a hole the size of the wooden dowel in the styrofoam ball. The hole should go about 1/3 way up through the ball. Place glue along the inside of the hole and insert the wooden dowel.


Step 18: Attach fake flowers to toothpicks
I used white roses for my flowers but you can use any type of fake flowers you would like! Pull the top of the flowers off of the steams, place hot glue into the center hole and insert a toothpick or small wooden dowel into it. The toothpick was almost too short for this, I would have preferred to use a small dowel.


Step 19: Insert paper and fake flowers into styrofoam ball
Now the fun part, insert the flowers into the styrofoam ball. Don’t try to be too precise, I made the mistake of trying to make it too perfect and symmetrical and was getting very frustrated. My advice is to start by placing one directly in the top middle and then just go for it! Have some idea of what you would like it to look like and then place them accordingly. For mine I tried to place a rose in the center of 4 paper flowers. No one will notice if it’s not perfect, they will just be so awed by your bouquet!


Step 20: Add pearl clusters
The finishing touch – pearls! I purchased these cluster of pearls from Michaels. I used wire cutters to cut them off and peeled off the outer foil. Next my wonderful fiance wrapped and hot glued the wire around a toothpick. I sporadically placed the pearl clusters to add a little something extra to the bouquet.


Now enjoy your beautiful wedding bouquet that will last you a lifetime!